Starting out
Procedural terrain generation is a huge part of a project I’ve been working on, with one of the core themes being “scale”. That has presented a number of challenges, such as rendering large amounts of objects in a performance-friendly way, a topic I’ll discuss in another (probably several) posts. One of the smaller, but still important areas, however, is in the terrain textures themselves.
Now, for a bit of background, the game world is split into chunks, each with a procedurally generated low-poly style mesh for the terrain. The world itself is split into a large map of biome types, a property of which is the colour of the ground. After the terrain heightmap is generated an appropriate biome is added, e.g. a mountain, forest, snow biome etc.

A super quick overview and I plan to go into more detail on these systems another time, the key takeaway here is we have a large mesh for our terrain (1km in size), with a generated texture assigned to it based on the biomes it contains. So, for the problem, when viewed as an overview in the menu, or from a distance in-game, this looks as intended:

The problem comes when we start to look closely…

There are several approaches I could take here, I could increase the resolution of the texture, though this comes at the cost of performance, since it would take longer to generate the textures, and perhaps more importantly, use significantly more memory to store them. A simpler solution perhaps would simply be to change the texture filtering mode from point to bilinear:
texture.filterMode = FilterMode.Point;texture.filterMode = FilterMode.Bilinear;Which would change out output to this:

Far more subtle, but at the cost of losing a lot of the definition between biome types, and in places, perhaps feeling a little “off”. For me, sharp edges are a must.

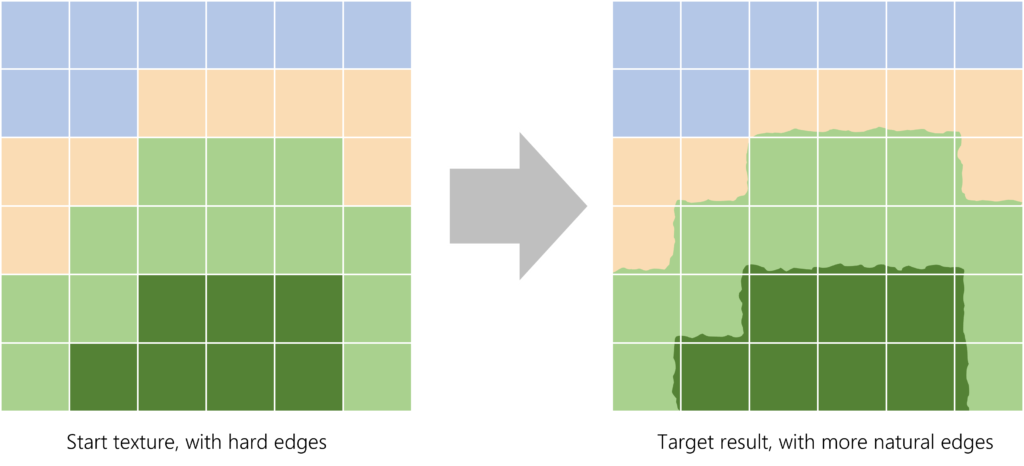
For my project then, the aim is to create a transition that keeps the cartoony feel but also keeps with the grid aesthetic. This is partly a visual style choice, but a design decision I feel would help with gameplay, as biomes will have an effect on the items placed within them, e.g. a farm will have a different output if placed in a field versus a desert, so keeping a clear distinction is a must. The effect should probably look something like this:

Enter shadergraph
Here’s where Shader Graph comes in, my project is built in Unity’s universal render pipeline (URP), which lets us use Shader Graph to create some fancy effects. I’m only using a simple implementation to achieve this effect, Shader Graph is quickly becoming one of my favourite Unity tools to experiment with and I highly recommend checking it out in more detail.
So, we start by creating a new Shader Graph, which we then assign to a material and use for the terrain mesh renderer.

Let’s start with a simple setup, we have a sample texture node, which takes an input texture and outputs to the color node. The output of this is exactly as we have seen previously, with the texture filter mode set to point: large squares representing each pixel of the texture.


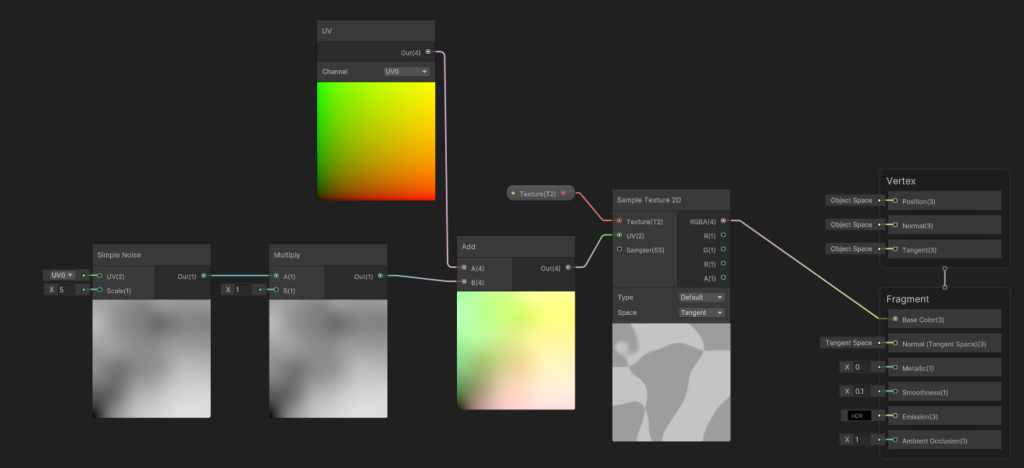
What we’re going to do is distort the texture in a way that creates more natural transitions between our biomes. so to do this we’re going to want to add a UV node and an Add node. Chained together these won’t yet have any effect, but what this setup does give us is the ability to add some noise to the texture and distort it accordingly.

So let’s add a simple noise node, along with a multiply node. For my use case, with large scale terrain. With the values for noise scale and multiply set to 5 and 1 respectively, we can start to see what effect this will have on our input texture:


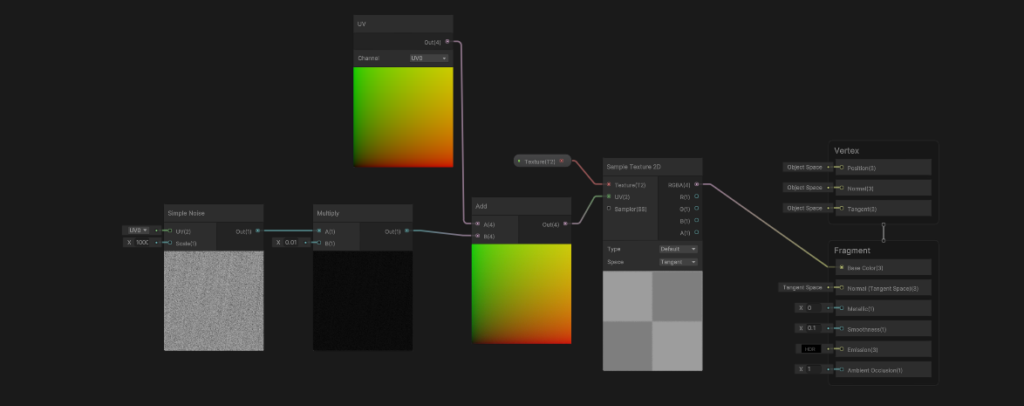
Now our input checkered pattern is warped, which starts to eliminate those hard edges. For my project this texture is applied on a 1km chunk of terrain, so this amount of distortion would be a little on the excessive side, to say the least. With a bit of trial and error, the combination I’ve settled on is a noise scale of 1000, with a multiply value of 0.01.

At first glance, in the Shader Graph editor this doesn’t appear to be doing anything, since the effect is far smaller in scale, but apply this to our terrain and we get an output that looks like this:
Result


No need to generate higher resolution textures, yet we get crisp edges regardless of view distance. It keeps the general grid-style I’m aiming for, but in a way that looks a little more natural. A small touch, but one that helps to add definition between areas without fundamentally changing the way the terrain or its textures are generated.
Of course, there are ways this could be taken further, I highly recommend trying out different noise types (e.g. gradient noise), or modifying the multiply and scale values to fine-tune the effect, but for now, I’ve achieved a result I’m much happier with!